Table of Contents
Step-by-Step Guide to Creating an NFT in Minutes
Step 1: Go to Token Tool and Connect your Wallet
Go to Token Tool and select Create NFT on the left hand side menu, and select the “single asset minting” tab. Then connect your preferred cryptocurrency wallet, such as MetaMask or Wallet Connect.
Select the network of your choice on which you wish to create the NFT. Token Tool supports top EVM chains, you can choose between Ethereum, Polygon, Avlanche, BNB Chain, Fantom, Aribtrum, Base and Optimism. You can also first try Token Tool for free on their respective testnets.
Make sure you have enough funds to pay network fees + service fees. Note: fees are paid in the native cryptocurrency of the network you’re using. For this example ETH, which runs on the Ethereum network.
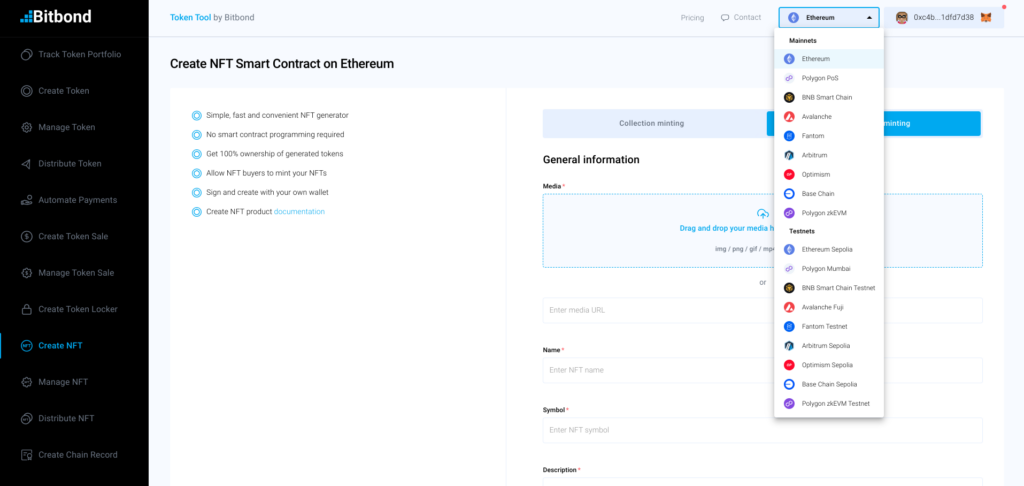
Step 2: Configure your NFT and insert parameters
In this example, we’ll be showing a digital image turned into an NFT. The content of choice is our cool “Crypto-Bitbonders” design that we came up with for the sake of this demo.
Define the following parameters for your NFT:
- Upload Image file or image URL: in here upload the image that you would like to tokenize. It is recommended to upload your file to make sure the image is always available. Uploading will happen to IPFS.
- Name: similar to creating ERC20 tokens you can define a name and a symbol. The name can be something more descriptive such as Crypto-Bitbonder #1.
- Symbol: the symbol can be something shorter such as CB1
- Description: describe what the NFT is about, potentially say something about the creator or the collection.
- Enable public minting: enables NFT minting for everybody once the NFT is deployed to the network. If this disabled, only the NFT creator can mint it.
- Start time and End time: If necessary, insert a start and end time for minting the NFT, this can be used in particular to create urgency for your NFT drop campaigns. If left empty, there is no time deadline.
- Mint price: this is the price to mint one NFT specified in the native cryptocurrency of the selected blockchain (e.g. ETH if Ethereum has been selected). If the price is set to 0, minting is free. Fees are transferred directly to the creator’s wallet. Token Tool does not receive the mint price.
- Max NFT mint amount per user: maximum amount that can be minted per user or creator of this NFT. If set to 0, there is no limit.
- Global max mint amount: this is the global total maximum supply of this NFT. If set to 0, there is no limit.
Step 3: Confirm transaction and pay fees
Now that you have set all your parameters according to the predefined terms, you’re ready to start tokenizing! Luckily, using Token Tool, you don’t need to write a single line of code to create or deploy the NFT to the network. Simple review the information filled and click Create NFT at the bottom of the page.
A pop window will appear with your wallet extension, you should confirm the transaction on your wallet for the process to be completed:
Step 4: Save NFT contract address and minting page link
After the NFT has been created successfully, you will see a modal with a link to the NFT miniting page and a link to the block explorer:
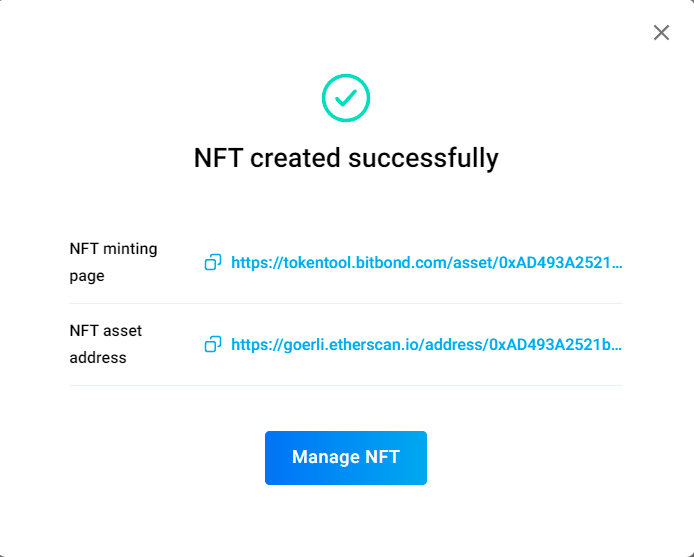
The NFT minting page link is particularly important. From here you can view your NFT and mint it. Make sure to also save the contract address for your NFT in order to easily manage it at a later stage using the Manage NFT function.
Step 5: Mint your NFT
Now that you successfully created and deployed your NFT to the network, you are ready to have it minted.
How to mint an NFT with Token Tool
Minting an NFT is like giving a special digital certificate to your artwork, making it one-of-a-kind and ownership-proof. You can show this certificate to others, and they can see how many other people have the same artwork. This certificate is held in the wallet you used when minting it.
Step 1: Go to the NFT minting page
Go to the “NFT minting page” link that you received after deploying your NFT to the network. You can also find it under the Manage NFT function by inserting the NFT’s contract address.
Step 2: Connect your wallet and Mint NFT
In the NFT minting page, connect your wallet at the top right, you will then see the NFT details. You can then click on the “Mint NFT” button at the bottom.
Step 3: Confirm transaction in your wallet and pay fees
Once you click on “Mint NFT”, a message in your wallet will appear to confirm the transaction. Review all information accordingly then click “confirm”. Once the transaction is processed by the network, you will be the proud owner of the NFT in question. You can easily see your NFT balance in our DeFi portfolio tracker.
How to easily create an NFT collection
Creating an NFT Collection is as seamless as the single asset NFT creation described above. Learn more in the video below:
How to distribute NFT in a few minutes
This function allows you to send NFTs to many recipients in one transaction. The NFTs that you want to send have to be in the wallet that is connected to Token Tool.
Copy and paste a list of addresses and the respective token ID that you want to send to each address. After that you will be asked to approve Token Tool to send NFTs on your behalf. You can control this approval by determining the maximum number of NFTs that Token Tool can send.
After sending the NFTs is completed, you can also revoke the permission for sending from Token Tool via MetaMask.
When sending NFTs, different error messages can appear:
- Error 1: Invalid wallet address
- Error 2: Duplicated address with Line X
- Error 3: Incorrect punctuation mark. Use commas between addresses, TokenID and amount and no spaces in-between
Some quick actions can be selected to resolve duplicate addresses:
- Keep duplicated addresses
- Delete duplicate records
Other errors have to be fixed manually or can be deleted automatically by using the “Delete incorrect records” function.
NFT Creation Made Easy: Unleash the Power of NFTs with Token Tool
The world of NFTs, or non-fungible tokens, is rapidly expanding, transforming the way we interact with digital assets. As the potential of this revolutionary technology unfolds, the demand for creating, managing, and distributing NFTs is skyrocketing.
Before starting, make sure you understand what is an NFT token.
Token Tool: Your Seamless NFT Creation Tool
Enter Token Tool, a user-friendly platform that empowers anyone to navigate the intricacies of NFTs without the need for coding expertise. With Token Tool, you can effortlessly create, manage, and distribute NFTs, unlocking a world of possibilities for your digital assets.
Harness the Power of NFTs to Build Your Digital Empire
NFTs are transforming various industries, from art and collectibles to gaming and real estate. They offer a unique way to represent ownership, authenticity, and value in the digital realm. NFTs can represent real world or digital assets, it tackles all kinds of use cases in different industries: Digital Content, Art, Gaming, Fashion and many more. In essence, creating NFTs consists of undertaking a process of how to tokenize an asset.
Token Tool supports Ethereum and 8 other EVM compatible protocols.
The Current State of the NFT Market: A Booming Ecosystem
The NFT market is currently in a state of exponential growth, in November 2023, “the NFT trading volume surged by an impressive 125%, nearing the $1 billion mark once again. Concurrently, the sales count experienced a modest 5% rise, totaling 3.6 million transactions. This data suggests a notable shift in user behavior, with an increased inclination towards buying and selling NFTs at higher prices”. According to a report by DappRadar.
NFTs: A Glimpse into the Future of Digital Ownership
NFTs have the potential to revolutionize the way we own, manage, and interact with digital assets. They hold the key to creating a new digital economy where ownership is verifiable, transactions are transparent, and value is tangible.
Voila! You have successfully created an NFT. The transaction may up to a few minutes to be processed and deployed to the respective network.
Unlock a World of Opportunities with Token Tool
Token Tool empowers you to seamlessly create, manage, and distribute NFTs, enabling you to:
- Tokenize your digital assets: Turn your art, collectibles, or any unique digital asset into an NFT.
- Enter the NFT marketplace: Discover opportunities to sell, trade, or auction your NFTs on leading marketplaces.
- Engage with the NFT community: Connect with other NFT enthusiasts, artists, and creators to expand your network and explore new collaborations.
Join the NFT Revolution with Token Tool
Embark on your NFT journey with Token Tool, the platform that simplifies NFT creation and management. Leverage the power of NFTs to build your digital empire and revolutionize the way you interact with digital assets. Learn how to monetize content with NFTs.

