Table of Contents
The Meld blockchain offers a unique platform for creating and managing a meld token, unlocking new possibilities for DeFi projects and asset representation. While traditional token creation often requires technical expertise, Token Tool simplifies the process, making it accessible to anyone. This guide will walk you through creating a Meld token in just six easy steps using Token Tool.
Before You Begin:
- Familiarize yourself with Meld tokens: Understand their role in the Meld ecosystem and their potential applications.
- Choose a supported wallet: Ensure you have a MetaMask, Coinbase Wallet, or WalletConnect wallet ready.
- Fund your wallet: Have enough funds to cover network fees (paid in MELD tokens).
- Research token standards: Meld currently supports the MELD token standard.
Let’s Create Your Meld Token!
Step-by-Step guide to creating a Meld token
Step 1: Access Token Tool
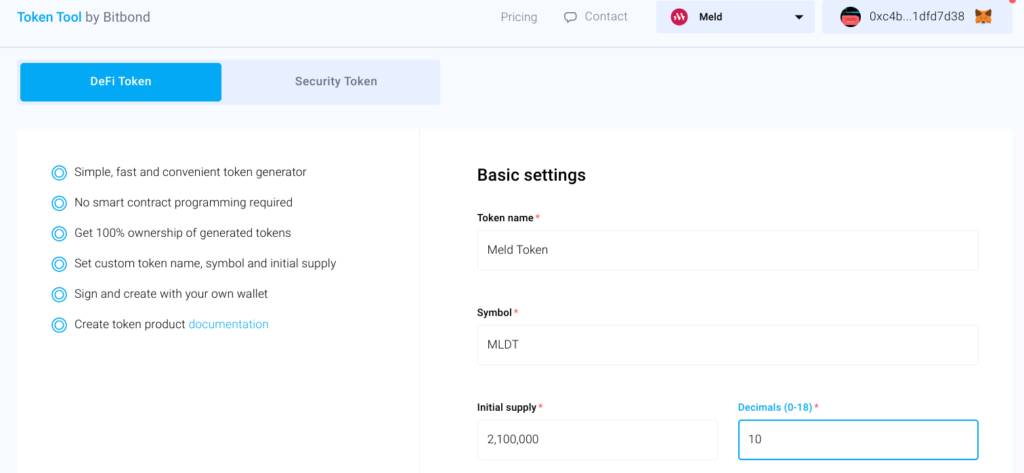
Head over to Token Tool and select “Create Token” from the sidebar menu. Choose between “DeFi Token” or “Security Token” to configure your token on the Meld blockchain. In this guide, we’ll walk you through the process of creating a basic MLD20 token on the Meld network. For that you should select the “DeFi Token” tab.
Step 2: Connect Your Wallet
Click “Connect Wallet” and select your preferred option. Ensure your wallet is connected to the Meld network.

Step 3: Define Token Properties
Once you have connected your wallet, you will see the form to configure your token parameters.
Fill in the form with your token’s details:
- Token name: The user-friendly name of your token.
- Symbol: The abbreviation for your token (e.g., MELDT).
- Initial supply: The total number of tokens created at launch.
- Decimals: The number of decimal places for your token’s value.
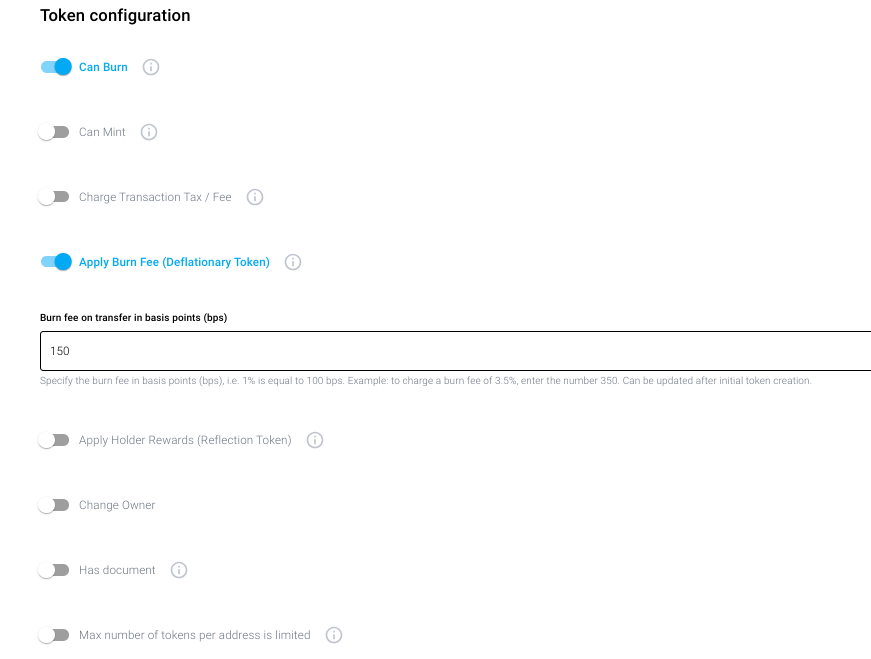
Step 4: Configure Token Features (Optional)
Under “Token Configuration,” you can enable specific features based on your token’s purpose. Remember, these features are set in stone once deployed and cannot be deactivated. Be sure to review the documentation for details on each feature. Once you know which features you need, you can proceed with enabling them and configuring them accordingly.
Step 5: Confirm and Pay Fees
Review your token details and click the “Create Token” button after agreeing to the Terms & Conditions. Confirm the transaction in your wallet and pay fees in the native cryptocurrency of the network. In this case it would be the MELD currency.
Step 6: Token Created!
Congratulations! Your Meld token is deployed on the blockchain. You’ll receive a pop-up with the transaction details and your token address.
Unleash the Power of Meld Tokens:
With Token Tool, creating and managing your own Meld tokens is a breeze. Explore the possibilities of DeFi, asset representation, and more on the Meld blockchain. Remember, this guide serves as a starting point. Always conduct thorough research and seek professional advice when needed.