Table of Contents
Avalanche: A Scalable and Efficient Blockchain Platform
The Avalanche ecosystem is a blockchain network that was first introduced by Ava Labs in 2020. Avalanche provides a scalable option addressing the issue of congested blockchain networks. Being the fastest platform measured by time-to-finality, Avalanche can process 6,500 transactions per second with sub-second finality. Avalanche is a rapidly growing blockchain platform that offers a unique combination of scalability, security, and decentralization. It is known for its lightning-fast transaction speeds, low fees, and EVM compatibility, making it an ideal platform for creating and deploying tokens.
Avalanche Uses Built-In Blockchains
What differentiates Avalanche from other blockchain projects is that the primary network is a combination of three separate chains. Each chain has its specialized use case and is validated by exactly one subnet. The three blockchains that make up the core of the platform are: The Exchange Chain (X-Chain), Contact Chain (C-Chain) and Platform Chain (P-Chain).
- Exchange Chain (X-Chain): The Exchange Chain is the default chain of the Avalanche network. It serves to create, exchange and manage assets. One example for an asset traded on Avalanche’s X-Chain is the AVAX coin.
- Contract Chain (C-Chain): We will use the C-Chain to deploy our AVAX tokens as it allows the creation of smart contracts using the chains API. The Avalanche C-Chain is EVM compatible, meaning developers can use the same tools as on Ethereum for creating Decentralized Applications (Dapps) on Avalanche.
- Platform Chain (P-Chain): The Platform Chain allows users to create subnets and specialized blockchains that can operate using their own set of rules. Thus, the P-Chain serves the management of subnets and coordination of validators.
Benefits of Creating Tokens on Avalanche
Creating tokens on Avalanche offers several benefits, including:
- Scalability: Avalanche can process thousands of transactions per second, ensuring that your tokens can be used for a wide range of applications without experiencing congestion or delays.
- Security: Avalanche’s unique Proof-of-Stake (PoS) consensus mechanism provides high levels of security and decentralization.
- Efficiency: Creating and deploying tokens on Avalanche is a relatively straightforward process, even for those with limited technical knowledge.
- Cost-effectiveness: The fees for creating and deploying tokens on Avalanche are significantly lower than those on other blockchain platforms, such as Ethereum.
Current Projects on Avalanche
At the time of writing, Avalanche lists 191 projects on their ecosystem ranging from Culture, DeFi, Exchange, Infrastructure and Tools to Wealth Management. Recently the project Tether, which is among the most popular stablecoins in the market, launched their USDt token on Avalanche network.
You can then follow the steps described in the guide below to go through the process of creating a token.
How to easily create a token on AVAX
Now that you have background information about the Avalanche network, it is time to follow the process below using the Avalanche mainnet.
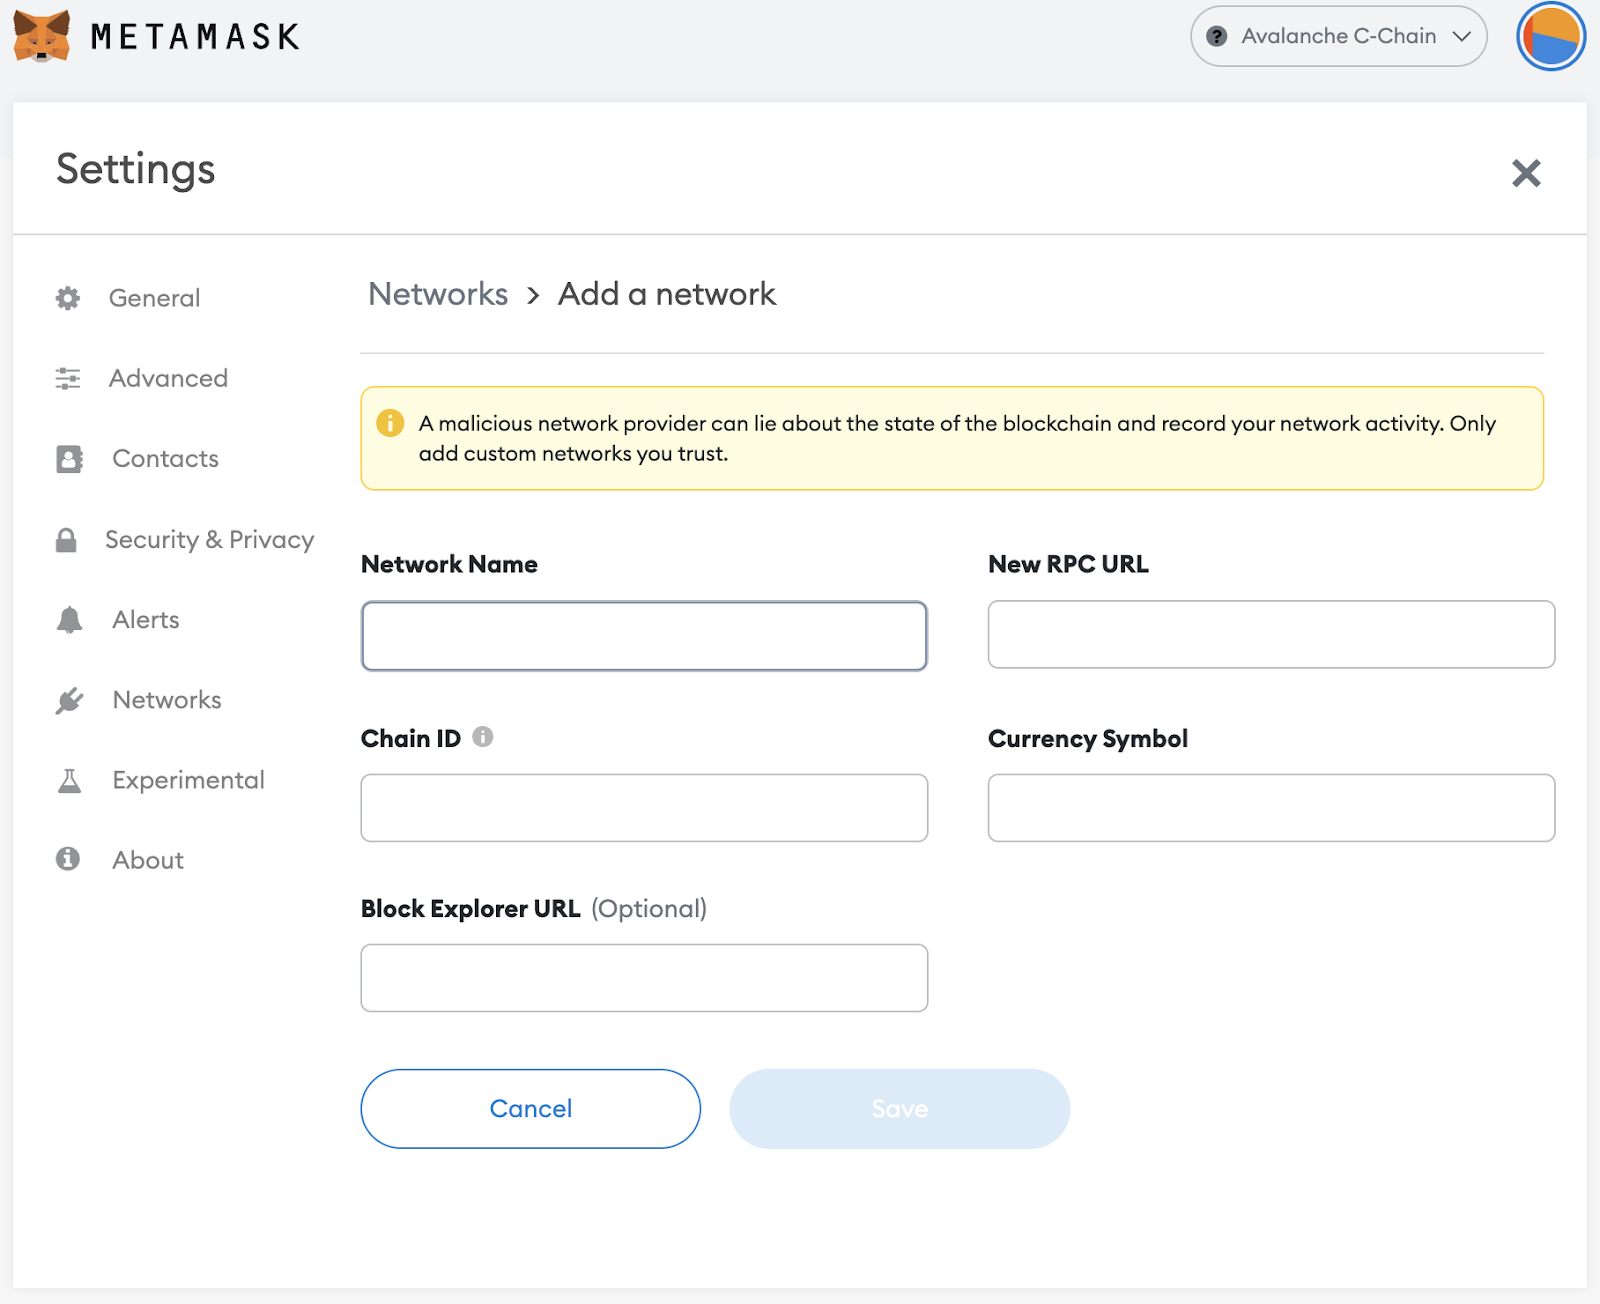
Step 1: Add Avalanche Network to Your Wallet
To be able to create a token on AVAX, you need to add the Avalanche Network to your MetaMask or wallet of your choice.Open the “Networks” Page and click on “Add network”. Then, set up the Avalanche Mainnet according to the information you find below:
- Network name: Avalanche C-Chain
- New RPC URL: https://api.avax.network/ext/bc/C/rpc
- ChainID: 43114
- Symbol: AVAX
- Explorer: Mainnet: https://snowtrace.io
You can find a more detailed guide for setting up Avalanche network on your wallet here.
Step 2: Go to Token Tool and Connect your Wallet
Open Token Tool in your web browser, go to “Create Token” from the left side menu bar, and connect your supported wallet. For example, you can connect your MetaMask wallet by clicking on the “Connect Wallet” button and selecting your MetaMask account. Make sure you have sufficient AVAX funds in your wallet to cover for the fees at a later stage.

Step 3: Select Network and Token Standard
Depending on whether you want to issue a token using the ERC-20 or ERC-721 token standard, choose “Create Token” or “Create NFT” from Token Tool’s menu. NFTs fall under the ERC-721 standard, check out our guide on how to create an NFT for more details. In this guide, we’ll walk you through the steps of creating a standard ERC-20 token.
To create your tokens on the AVAX network, select “Avalanche” from the network selection menu on the left side of the “Connect Wallet” button. Please note that both, your wallet and Token Tool, must be connected to the Avalanche network.
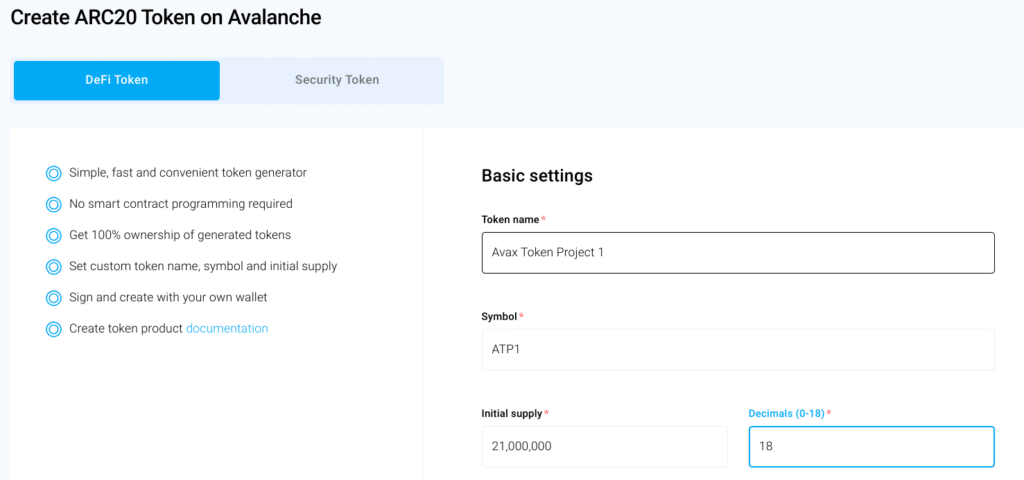
Step 4: Specify your Token’s Properties and Features
Enter the following information about your token:
- Token Name: Enter a descriptive name for your token.
- Token Symbol: Enter a short and memorable symbol for your token.
- Initial Supply: Enter the total number of tokens you want to create.
- Decimals: Enter the number of decimal places to use for your token’s value.
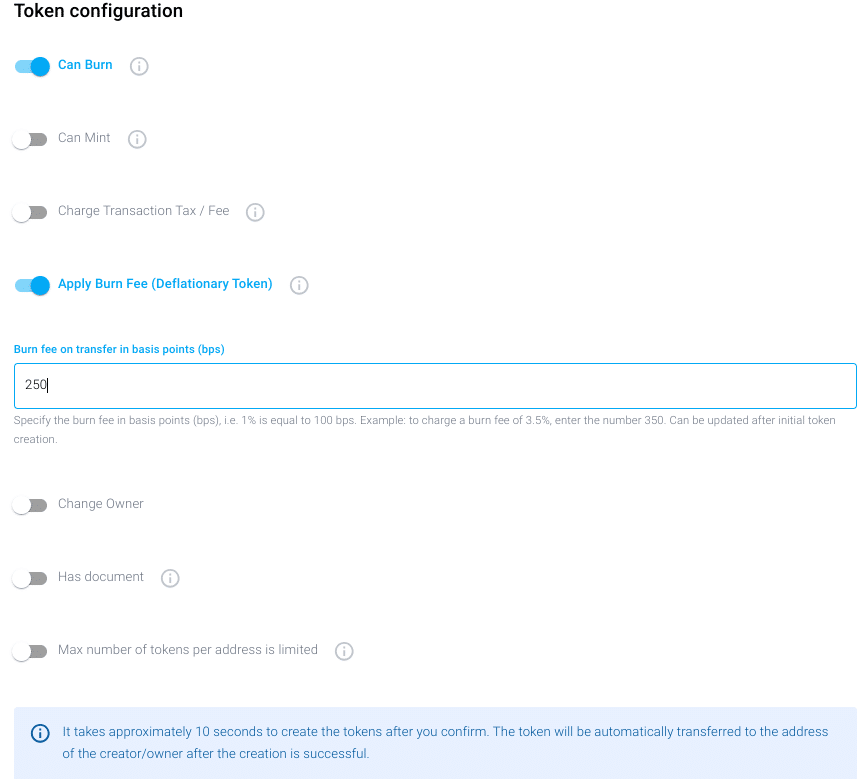
You can then add additional features to further characterize your token. In addition to the basic properties of your token, Token Tool offers optional functionalities to add to your token parameters. Make sure to toggle the button of the features you wish to have added to your token. Selected features will be activated upon deployment of your token and they cannot be removed once the token contract is deployed to the network.
Step 5: Confirm and Pay Fees to Deploy Tokens on the Avalanche Network
After reviewing the information you filled in, click on “Create Token” to deploy your token to the AVAX blockchain. Confirm the transaction in your wallet. Once complete, a pop up window will appear with your block explorer link and token contract address as shown in the screenshot below. You can use the token address to manage your token at a later stage.
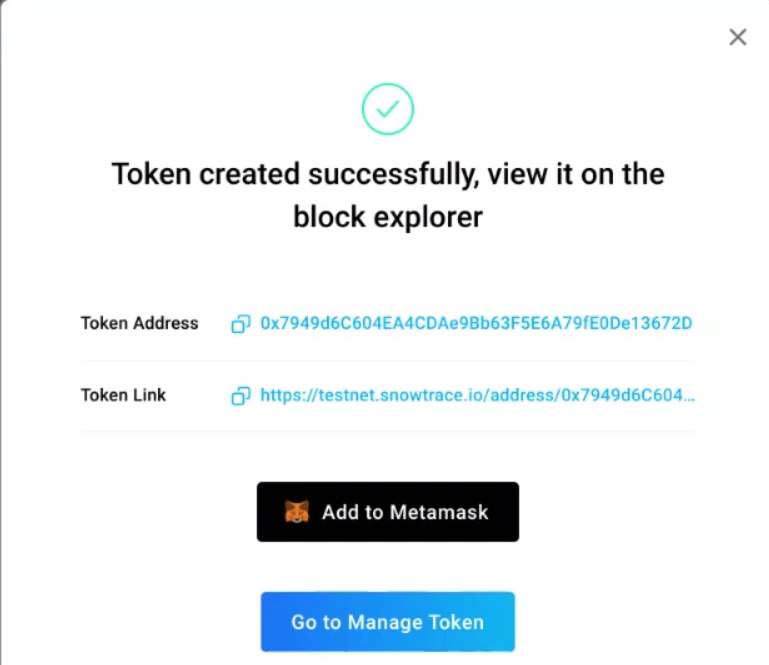
Congratulations! Your token has been successfully deployed to the Avalanche network.
Test Token Tool for free using the Avalanche Testnet
If you wish to to assess the functionality of creating a token on Avalanche, you can go through the process by simulating a fake purchase using a test network. Creating a token on the Fuji testnet is similar to creating a token on the Avalanche mainnet. However, you pay gas and service fees using faucet coins. Faucet coins are basically “fake” currencies of the network you’re using, in this case it would be AVAX, it is the means of payment used on the testnet of the designated network. You can request a limited amount of faucet coins for free, using the AVAX faucet request platform.
Note that the “testnet” differs from the “mainnet” and you will need to set up a different network when creating a real purchase. Follow the process described in Step 1 below in the guide to learn how to add a network in your MetaMask wallet. The information to be filled for adding the Avalanche Fuji testnet are the following:
- Network name: Fuji Testnet
- New RPC URL: https://api.avax-test.network/ext/bc/C/rpc
- ChainID: 43113
- Symbol: AVAX
- Explorer: https://testnet.snowtrace.io
Summary
Ethereum network has proven to be quite costly and more time consuming, making it less efficient than other blockchains available. This lead to the rise of so-called EVM-compatible protocols that have much higher transaction processing speed for a significantly lower cost. EVM stands for Ethereum Virtual Machine, meaning they are compatible with the Ethereum network as they are written in the same programming language (i.e. Solidity). Avalanche is a great alternative for creating tokens due to its fast transaction speed, low costs and EVM compatibility. On the other hand, creating smart contracts and deploying them on blockchain, can come with great technical hurdles, especially when someone lacks the necessary technical knowledge.
As we believe in the tokenization of everything and strive to make tokenization accessible for everyone, Token Tool enables users to effortlessly create, deploy and manage ERC-20 and ERC-721 tokens to Avalanche and other EVM protocols without requiring them to do any coding. Participating in DeFi and leveraging the power of blockchain technology has never been easier, simply connect your wallet, fill in the blank and click create tokens.
If you want a more detailed description of how to create any token on Token Tool, you may want to read our article create your own token in 5 minutes using Token Tool. If you’re interested to implement tokenization technology within your organization, make sure to reach out for a free consultation with one of our experts.